Crafting the Perfect Playroom: A Step-by-Step Guide to Designing a Functional and Inspiring Space
Introduction
A playroom is more than just a room filled with toys—it is a sanctuary where imagination takes flight, skills are developed, and childhood memories are forged. However, without a thoughtful plan, even the largest space can quickly descend into chaos. Designing a playroom requires balancing aesthetics with practicality, safety with creativity, and child-friendly features with parent-friendly organization. Whether you are converting a spare bedroom, a basement corner, or a dedicated area in your living room, a well-structured playroom plan ensures that the space evolves with your child’s needs while remaining manageable for the whole family. This guide will walk you through every critical phase of creating a playroom that works—from assessing your constraints to executing a budget-friendly, durable, and joyful design.
Step 1: Assessing Your Space and Understanding Your Child’s Needs
Before you purchase a single storage bin or paint a wall, take a deep look at both the physical space and the developmental requirements of your child. Measure the room carefully, noting windows, doors, electrical outlets, and any architectural quirks like sloped ceilings or radiators. This information will dictate furniture layouts and safety considerations. At the same time, ask yourself: What does my child enjoy most right now? Is she a budding artist who needs an easel and washable surfaces? Is he a builder who requires a large floor area for block towers? Do you have a toddler who needs soft zones for tumbling, or a school-age child who needs a quiet homework nook? Also consider the age gap if you have multiple children—common areas should accommodate both gentle and boisterous play. Write down a list of “must-have” activities: reading, building, pretend play, arts and crafts, and maybe physical movement. This list will be your compass throughout the planning process.
Step 2: Defining Activity Zones for Seamless Flow
A well-planned playroom is not a single open sea of toys; it is a collection of distinct zones that encourage focused play and easy cleanup. The most effective layout typically includes three to five zones, each defined by function and separated—visually or physically—by rugs, low shelving, or furniture placement. For example, a quiet zone might feature a small bookshelf, a floor cushion, and a cozy reading nook. A creative zone could include an easel, a low table for art projects, and a washable floor mat. A building and STEM zone needs a clear, flat surface free of tripping hazards, with storage for blocks, puzzles, and magnetic tiles. If space allows, a dramatic play zone with a play kitchen, dress-up costumes, and a small puppet theater can fuel imagination. For active children, consider a movement zone with a mini trampoline, foam blocks for climbing, or a balance beam—but ensure soft flooring in that area. Use open shelving to define zones without blocking sightlines, so you can easily supervise from across the room. Label bins with pictures for younger children and words for older ones, so they learn to return items to their designated homes.
Step 3: Choosing Furniture That Works Hard (and Grows With Them)
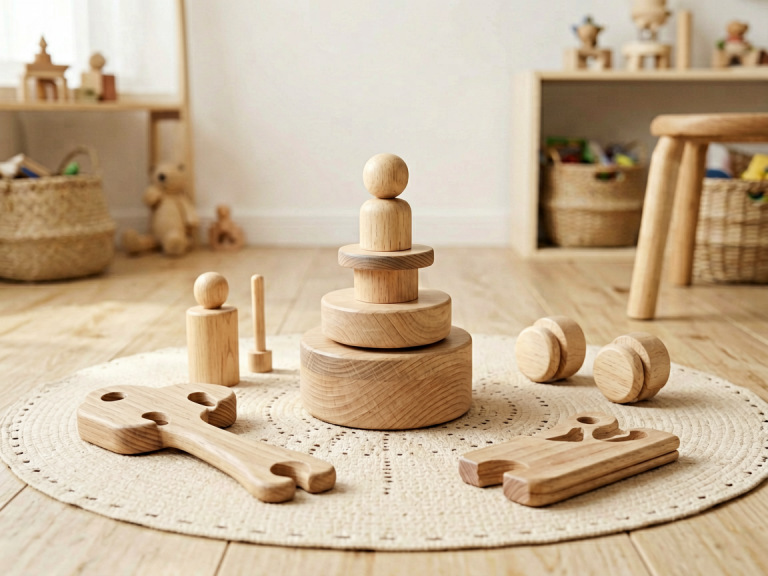
Furniture selection is where many parents either overspend on trendy pieces or underestimate the need for durability and adaptability. Start with the basics: a child-sized table and chairs with smooth, rounded edges and stain-resistant finishes. Look for tables that can be adjusted in height as your child grows, or that double as storage units (e.g., a table with cubbies underneath). For seating, consider poufs, beanbags, or small armchairs that are lightweight enough for a child to move independently. Avoid heavy, glass-topped tables or sharp-cornered pieces. Storage is the backbone of any functional playroom. Open cubbies are excellent for toys that are used daily, while closed bins and cabinets can hide messy items like crayons, playdough, and puzzle pieces. Use clear containers for small parts so children can see what’s inside without dumping everything. A floor-to-ceiling bookcase can anchor the quiet zone, but ensure it is anchored to the wall to prevent tipping. If the room will also serve as a homework space later, incorporate a small desk with a task lamp. Remember: less is more. Over-furnishing a small room can limit floor play and create clutter. Choose multifunctional pieces—like a storage ottoman that doubles as seating—to maximize every square foot.
Step 4: Prioritizing Safety, Durability, and Easy Maintenance
Children are messy, active, and unpredictable. Your playroom plan must account for the inevitable spills, tumbles, and wall-scratching episodes. Start with flooring: soft carpet tiles are warm and forgiving for falls, but they stain easily. Luxury vinyl plank (LVP) or cork flooring provides a cushioned yet wipeable surface, and you can layer with washable rugs in high-traffic zones. Avoid area rugs that slide; use non-slip rug pads underneath. For walls, choose washable paint (matte or eggshell finish, though satin is easier to clean) and consider a chalkboard or whiteboard wall panel in the art zone—covered with a clear, writable film. Anchor all tall furniture to the wall, even if it seems stable. Cover electrical outlets with safety plugs, and ensure cords from lamps or electronics are tucked away. Check that all toys and furniture meet safety standards (no lead paint, no small parts for toddlers). Also, think about noise: adding acoustic panels or thick curtains can dampen the sound of excited children, making the room more pleasant for the rest of the house. Finally, design with cleaning in mind: choose bins that are easy to wipe down, avoid fabrics that require dry cleaning, and create a “cleanup station” with a small broom, dustpan, and a bin for dirty clothes if the playroom includes dress-up items.
Step 5: Building in Flexibility for Growing Children
A playroom plan that works for a two-year-old may be completely obsolete by the time that child turns six. To avoid a full redesign every two years, incorporate elements that evolve. For example, choose a neutral color palette for walls and large furniture (white, gray, or soft beige) and add personality with removable wall decals, changeable art, and colorful accessories. The same open shelving used for board books now can later hold chapter books and board games. A low art table can later become a Lego-building station or a table for homework. Invest in a storage system that can adapt—cubbies with removable bins allow you to swap toy categories as interests shift. If you have a baby, plan a corner with a soft play mat that can become a reading corner when they outgrow the mats. Also, consider modular furniture: a cube shelving unit can be reconfigured into a low bench with storage, or laid horizontally as a room divider. By thinking ahead, you save money and reduce waste, while your child enjoys a space that feels familiar yet fresh.
Step 6: Infusing Personality, Themes, and Sensory Stimulation
While functionality is crucial, a playroom should also spark joy and reflect your child’s unique interests. Involve your child in the planning—ask them to choose a theme (jungle, space, underwater, fairy garden, or a favorite storybook). A theme doesn’t mean covering every surface with cartoons; instead, incorporate subtle nods through color accents, wall decals, and themed storage bins. For example, a “space” room might have a dark blue accent wall with glow-in-the-dark stars, a small telescope by the window, and rocket-shaped shelves. A “nature” theme could use greens and browns, leaf-shaped cushions, and a small indoor plant (safe for children). Pay attention to sensory stimulation: include a variety of textures (soft rugs, smooth wooden toys, bumpy sensory mats), calm lighting (avoid harsh fluorescent tubes—use warm, dimmable lights or string lights), and perhaps a small “calm-down” corner with a weighted blanket and noise-canceling headphones for overstimulated children. Display your child’s artwork proudly using a wire-and-clip system or a low gallery wall. This personalization makes the room feel like theirs, encouraging ownership and care.
Step 7: Budgeting and Execution—Turning the Plan into Reality
Creating a playroom plan on paper is one thing; executing it within your time and financial constraints is another. Start by listing everything you need, from paint to storage bins to furniture, then prioritize. You don’t have to do it all at once. For example, you can paint the walls, lay a safe floor, and install essential shelving in the first phase, then add a play table and a reading nook over the next few months. Look for secondhand furniture—many children’s pieces are barely used and can be refreshed with a coat of non-toxic paint. Repurpose items you already own: a low bookshelf can become a toy display; a kitchen island cart can hold art supplies. When buying new, focus on items that meet safety standards and have good reviews for durability. Set a realistic budget and add a 15% contingency for unexpected costs (like needing an extra rug pad or outlet covers). Execution also involves time management—plan to do the heavy work (painting, assembling furniture, installing shelves) during a weekend when your child can stay with grandparents or a friend. After the physical setup, spend time organizing toys with your child, teaching them where everything goes. A clear, consistent system from day one will prevent the playroom from becoming a disaster zone.
Conclusion
Making a playroom plan is an investment in your child’s development, your family’s harmony, and your own sanity. By assessing your space, defining zones, choosing safe and adaptable furniture, and infusing personality, you create a room that grows alongside your child. Remember that perfection is not the goal—functionality and joy are. Allow the playroom to evolve; observe how your child uses the space, and don’t be afraid to rearrange shelves or swap out toys seasonally. A well-planned playroom becomes a favorite destination, not just for children but for the whole family, fostering creativity, independence, and countless precious moments of play. Now, grab a measuring tape, a notebook, and your child’s input, and start building the playroom of their dreams.